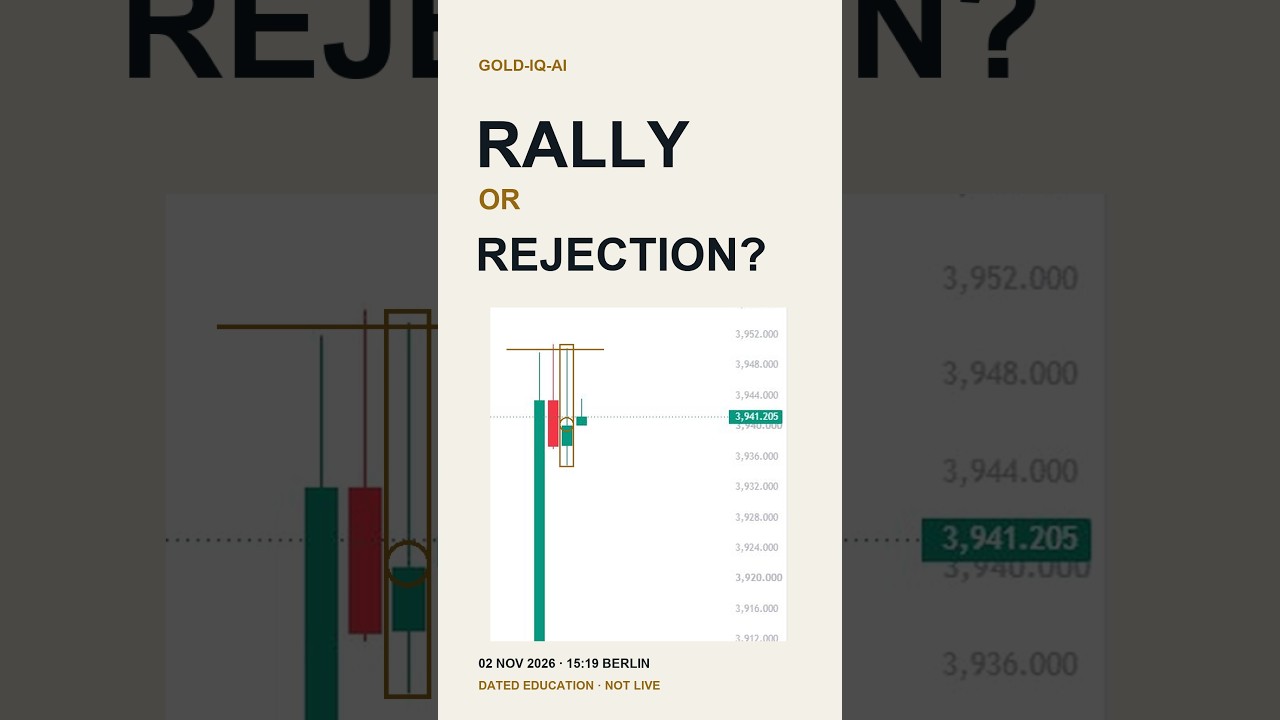
A tall wick can catch the eye, but it cannot confirm a breakout on its own. This dated XAU/USD case study explains what a candle actually proves, why the closing location matters and how a separate retest changes the quality of the evidence.
Snapshot: 2 November 2026, 15:19 Berlin (UTC+1), TradingView / OANDA:XAUUSD, 15-minute chart. This is historical education, not a live market update or trading signal.
Watch the 56-second chart lesson
Watch the video on YouTube if the embedded player does not load. The video is supplementary; the full method is documented below.
What the snapshot actually showed
The completed 15:00 candle reached 3,950.230 but closed at 3,940.120. The approximate 3,950 area was therefore a wick-test reference—not a confirmed breakout or claimed daily high. The next candle was still forming at the snapshot time, so its temporary price could not be treated as a completed close.
The close tells us where the market accepted price when the observation period ended. A wick tells us where price traded temporarily. Both contain information, but they answer different questions.
How to read the candle correctly
- Range: the high and low show the full auction during the candle.
- Body: the open-to-close distance shows where the period began and ended.
- Close location: a close near the high is different from a close far below a tested resistance area.
- Context: the same candle means less when it forms inside a range than when it closes beyond a well-tested boundary.
In this example, reaching 3,950 but closing around 3,940 indicated rejection from the upper area during that completed candle. It did not prove that gold must fall next; it only showed that buyers had not secured acceptance above the test area.
The two-step confirmation rule
A higher-quality breakout requires two events:
- Close first: a completed candle closes beyond the resistance zone.
- Retest later: a separate return holds the reclaimed edge as support.
The separation matters. Using the still-forming breakout candle as both the close and the retest creates evidence that does not yet exist.
What makes a retest useful?
Not every pullback is a good retest. The strongest examples usually share several features:
- Price returns in a controlled way rather than collapsing through the level.
- The former resistance zone attracts buyers without repeated deep closes below it.
- A later candle confirms that the market is again accepting price above the edge.
- The retest occurs before the move becomes so extended that the original invalidation is impractical.
Invalidation is part of the analysis
Losing the reclaimed edge invalidates the breakout test. In this dated example, a completed close below the approximate 3,935 lower reference would weaken the immediate structure. That level is not a permanent support or a recommendation; it belongs only to the stated chart.
Invalidation should be defined before a decision. Moving it after price turns against the idea changes the test and makes later evaluation unreliable.
Common mistakes this framework prevents
| Mistake | Better rule |
|---|---|
| Calling a wick a breakout | Wait for the completed close |
| Using an unfinished candle | Evaluate only after the timeframe closes |
| Treating one candle as close and retest | Require a later, separate test |
| Assuming confirmation guarantees profit | Keep explicit invalidation and risk limits |
Reusable checklist
- Is the candle complete?
- Did it close beyond the whole zone?
- Did a separate retest hold?
- Does the higher timeframe support or oppose the move?
- What exact evidence invalidates the interpretation?
Takeaway: read the close, then evaluate the retest. Evidence first; labels later. Even a confirmed close and holding retest improve the quality of the setup but cannot guarantee the next move.
Continue with the 15-minute chart strategy and the position-sizing guide.
Chart source: TradingView, OANDA:XAUUSD. Figures refer only to the dated snapshot. Educational content only, not financial advice, a target or a promised return. Last reviewed 2 November 2026.



0 Comments